Pantana Pro Tips

Get Your Google Business Profile Discovered More Frequently with Paid Google Ads!

Wanna run ads to promote your Google Business Profile? You better say “YES!”

I’ve said it before:  pretty much EVERY product or platform, feature or function Google offers for business-promo purposes:  DO IT! Operation, “Game-on, Google!”

Did you know there are about 3.5-billion searches run on Google each and every day—of which, 46% are of local intent. And so, consequently, Google has been doing a lot to advance its relevance in terms of supporting location-sensitive search behaviors. Point is:  if you’re running a local business, Google is literally your best bud.

Now, I’ve posted a fair bit of content in the past (CLICK HERE) with regard to optimizing/leveraging your Google Business Profile (formerly called, “Google My Business”). In today’s training, we’ll go one step further by running Google Business Profile ads (a.k.a. “Google Local-Search Ads”).

Want would-be customers to call you directly? Then watch this training, setup the ads, and turn your ringer on 📲

How to Run Google Display Network Ads in 2022 (for REALTORS): Step-by-Step Video Training

🚨Don’t do JUST Google Display Network ads!🚨

As far as online advertising goes, Google Display Network ads certainly aren’t the “be-all, end-all” — but they’re the perfect “in-between.”

What I mean is, if your entire online advertising strategy were to consist of nothing but Display Network ads, chances are, you’d be disappointed with the results. On the other hand, if you utilized Display Network to reinforce ALL your other marketing efforts—e.g. videos, social media, SEO, signage, postage, and so on—they’d work like magic!

  • Display ads as your ONLY marketing? Don’t bother.

  • Display ads as PART of your marketing? It’s like pouring gasoline⛽️ on fire🔥

The Google Display Network (GDN) is a group of over 2-million (more like 3-million) websites, videos, and apps where your “Display” ads can appear. Display ads (sometimes called “Banner ads”) are image-, text-, and/or video-based ads that crop up all over the Internet:  website side-columns, pop-up banners and bars, or located along the footers of mobile apps, for instance. And they come in myriad shapes and sizes:  square-shaped, tall-and-skinny, or wide-and-skinny, for example.

Today’s training video demonstrates how to create and run Google Display Network ads from start-to-finish! That said, the content focuses primarily on “how” to run the ads, not on “what” ads to run, necessarily. Good news is that part is simple! SHOW ME YOUR FACE 😇

End of day, GDN ads are about building brand awareness/consideration.

  • Your voice 🗣

  • Your mind 🧠

  • Your heart ❤️

  • Your face 😙

Sure, you could feature images/videos of properties. Unfortunately, though, most viewers won’t be paying close enough attention to consciously realize it’s your ad—so why even bother!? Logos and branded colors will absolutely go a long way—but there’s nothing as effective as images (or videos) of YOU!

(P.S. There’s a lot of psychology and neuroscience behind this: learn more HERE.)

“Oh, you’re that agent—I see you everywhere!” I promise, you’ll hear it again-and-again.

4 YouTube (TrueView) Ads for Realtors to Run in 2021

YouTube is an ideal advertising platform. Here’s why:

  1. It’s the second-most popular website on the planet 🌎—runner-up to its parent company, Google. What’s more, by extension, it’s also the second-most utilized search engine here, there, or anywhere.

  2. Amongst video-streaming apps and sites, it holds the top-spot by a sizable margin in terms of total watch-time. You might’ve heard TikTok recently unseated it, which isn’t actually the case. TikTok is indeed number-one in terms average watch-time per user—however, YouTube has considerably more users.

  3. YouTube is a more of a search-engine than a social-network. On social platforms, for instance, users are conditioned to scroll (mindlessly, on occasion). On YouTube, however, users are accustomed to search for content of a specific type or topic, which demonstrates intent. From an advertising and targeting standpoint, intent is everything!

Whether you’re looking to build-up brand-awareness, grow an audience, or generate leads, YouTube ads are a definite way to go!

Exploring Different Types of YouTube Ads

YouTube provides numerous different advertising products:  e.g. in-stream ads, in-feed ads, display, overlay, and more.

Some ad formats are created in Google Ads (formerly known as, AdWords) whereas others are placed on a reservation basis through a Google sales representative.

This video/article covers in-stream and in-feed video ads, dubbed, “TrueView” YouTube ads—which are made in Google Ads

The term, “TrueView,” refers to the length of time a viewer watches a specified video. For example, the viewer must watch the subject video ad for a minimum of 30 seconds. If the full video ad is less than 30 seconds long, the viewer must watch the video in its entirety. If they don’t, it’s not a TrueView, and thus, it doesn’t count against your ad-spend.

And remember, because it’s a video ad, your viewers aren’t just random people; they’re your target audience (based on your campaign settings).

There are two distinct types of “TrueView,” YouTube ads:

  1. In-Stream: the, quote-unquote, “commercials” that play before, during, or after a video on YouTube. If you’re a frequent YouTube viewer, you might’ve noticed varying subtypes of in-stream ads.

    • Skippable - presents viewer with a “skip ad” option after five seconds elapses. Don’t forget, a TrueView requires a viewer to watch at least 30 seconds or the duration of a video ad or the advertiser isn’t charged.

    • Nonskippable - up-to 15-second videos in which the viewer has no option to skip. Every view would count as a TrueView seeing as how the viewer must watch from start-to-end.

    • Bumper - same as the nonskippable format but only up to six seconds long.

  2. Video Discovery: when you see a promoted video in search results, recommended alongside related videos, or displayed on the Home Feed.

Considering YouTube’s Video-Discovery Algorithm

Before rushing into ad creation, keep in mind, a YouTube ad is simply a promotion of a natively uploaded video that lives on your Channel. That means the paid performance of the video and its organic performance are inextricably linked. In other words, an ad could potentially damage your video’s organic performance. Here’s how:

The YouTube algorithm runs off of two primary variables: A. Watch-Time and B. Click-Through Rate (CTR).

WATCH TIME:

Watch Time is what it sounds like:  the average amount of time viewers spend watching your video. The longer your video’s average watch-time, from YouTube’s POV, the greater its relevance to a designated topic—which means, increased distribution (e.g. search results, feeds, etc.).

CLICK-THROUGH RATE:

The Click-Through Rate means that when a prospective viewer is shown your video (in search results, as a recommended next video, or in YouTube’s browse features), YouTube monitors how often viewers click to watch. If they do, that signals YouTube to keep distributing your video far and wide. If they don’t click, then YouTube holds your video back, pure and simple.

Your video’s thumbnail (i.e., the preview image attached to the upload) and its title are the top influencing factors of its CTR.

**CLCK HERE TO LEARN MORE ABOUT THE YOUTUBE ALGORITHM**

So think about this:  if you upload a video to your Channel and then run it, for instance, as a skippable in-stream ad—and then, as the campaign runs, its viewers hit the “Skip-Ad” button time-and-again—from an SEO standpoint, you’re literally tanking your video’s hopes of organic performance.

My thought is, if your video is time-bound—meaning, its content will become irrelevant or outdated quickly, then run it as an ad. On the other hand, if the video is considered timeless, then you may be better off to let it be and see what comes of it organically. 

(Step-by-Step) YouTube Ad-Campaigns for REALTORS®

Today’s video training demonstrates four (4) different YouTube ads, outlined below. Watch the video to for step-by-step instructions!

  1. Just-Listed Video Ad Campaign

    • Description: upload your next listing video to YouTube to utilize as an ad. Include a clickable thumbnail.

    • Ad-Format: skippable in-stream

    • Audience-Targeting: homeowners + purchasing a home soon + in-market for residential properties, located in your defined geographic area.

  2. Home Valuation Video Ad Campaign

    • Description: record and upload a video offering homeowners an instant home-price estimate; briefly speak of local market conditions and home-value appreciation.

    • Ad-Format: skippable in-stream

    • Audience-Targeting: homeowners located in your defined geographic area.

  3. Local Market Update Video Ad Campaign

    • Description: upload/ a market video explaining nothing but the facts specific to your area’s housing market. Repeat process monthly.

    • Ad-Format: skippable in-stream

    • Audience-Targeting: homeowners located in your defined geographic area.

  4. The “Queue-Jumper” Video Ad Campaign

    • Description: promote a video intended to perform organically (over time) to rank top-of-page in YouTube search results.

    • Ad-Format: video discovery; YouTube search results only (disable Video partners on the Display Network and YouTube Videos)

    • Audience-Targeting: keywords specific to your video’s topic.

Watch the video, get the training, and take advantage of YouTube ads to promote and grow your business!

How NOT TO Make Changes to Your Google My Business Profile

Did you catch the in-depth training video I shared last week on the top factors to improve the ranking of your #GoogleMyBuisiness in search results?

For example, a potential buyer or seller runs a search like: “𝚛𝚎𝚊𝚕 𝚎𝚜𝚝𝚊𝚝𝚎 𝚊𝚐𝚎𝚗𝚝 𝚗𝚎𝚊𝚛𝚋𝚢.” If you’re an agent who’s nearby, that’s a search to rank on!

Thing is… Google My Business can get a tad temperamental. For instance, if you make too many changes to your profile all at once (kind of a red flag ), it could result in an account suspension—of which, there are two different types:

Soft Suspension: basically, your GMB’s “verified” status is removed and you can no longer edit/manage your GMB. It still lists and ranks in searches though.
Hard Suspension: your GMB is altogether removed—meaning, it’s over! Your profile will no longer index in Google Search or Maps.

So, before you rush in and start changing primary info—i.e., details linked directly to your GMB’s verification status—such as, your business name, its phone number, website, or its mailing address, SLOW YOUR ROLL.

Rather than making a bunch of tweaks in one sitting—instead, make a change, wait for Google to review and approve it, and then proceed with your next update (cautiously). Happy Google ranking, friends!

Local SEO Ranking with Google My Business for Real Estate Agents (2021)

For any type of local business—shops, services, and so forth—ranking on local-intent Google searches is extremely advantageous:  website clicks, inbound customer calls, messages, and more!

For example, a prospective home seller may enter a search phrase like, “real estate agent nearby.” If you’re a real estate agent who happens to be close-at-hand, that’s the type of search to wanna rank on!

But it’s easier said than done. SEO has never been as simple as ABC.

Whenever Google’s algorithm infers the aim of a search is seeking something or someone local it lists geographically-tuned results (more on this later). Unfortunately, given the algorithm’s inherent complexities—plus extensive competition at the local level—it can be confusing to know exactly where to focus your optimization efforts to maximize the results.

But consider this:  per a recent WhiteSpark study, the importance of Google My Business (GMB) has increased greatly over the past several algorithmic updates in terms of its weight in the search results. The point in bringing his up is to suggest that rather than trying to do all-things SEO to rank, it’s strategically viable to simply focus on improving your GMB. (You can breathe a sigh of relief now 😅)

Today’s video-training/blog explores 5 ways to improve the ranking of your GMB—thus, leading to more website traffic, more calls, and, ultimately, more customers!

Components of Google’s (Local) Search Results

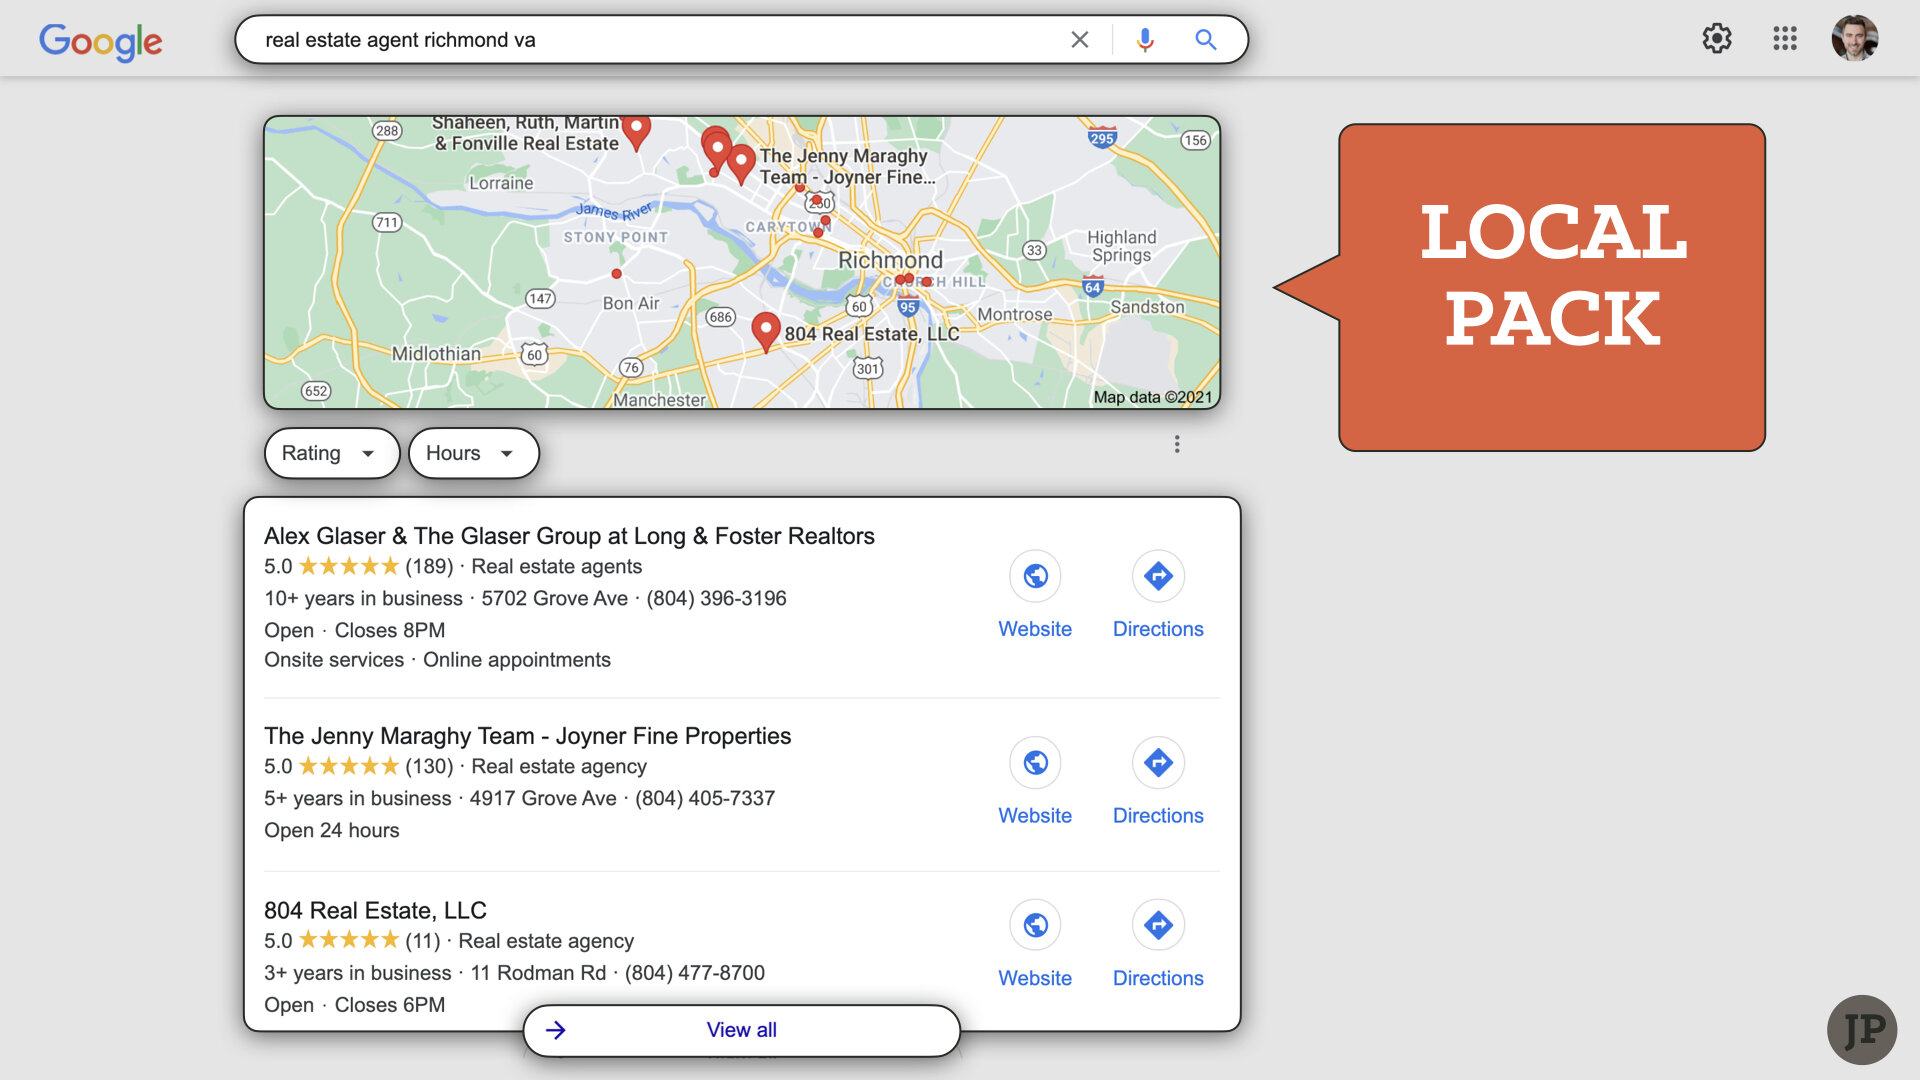
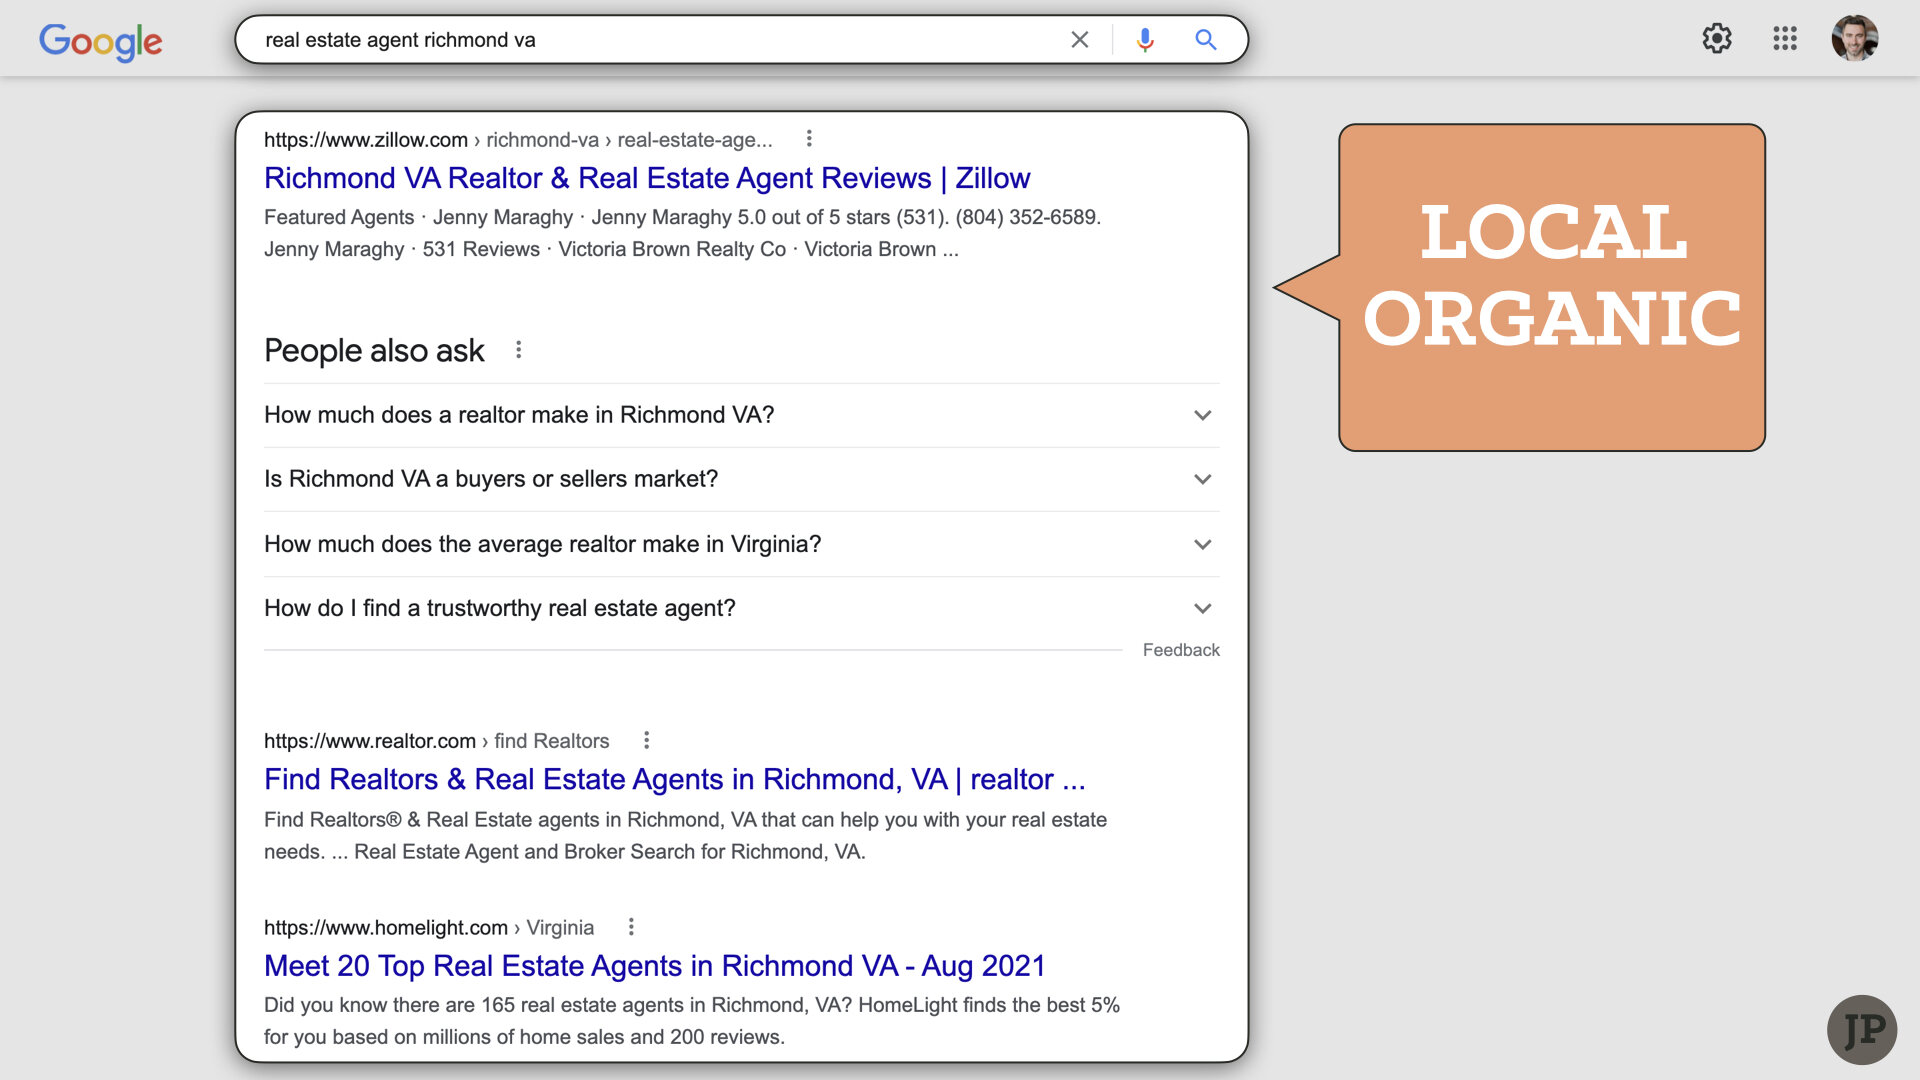
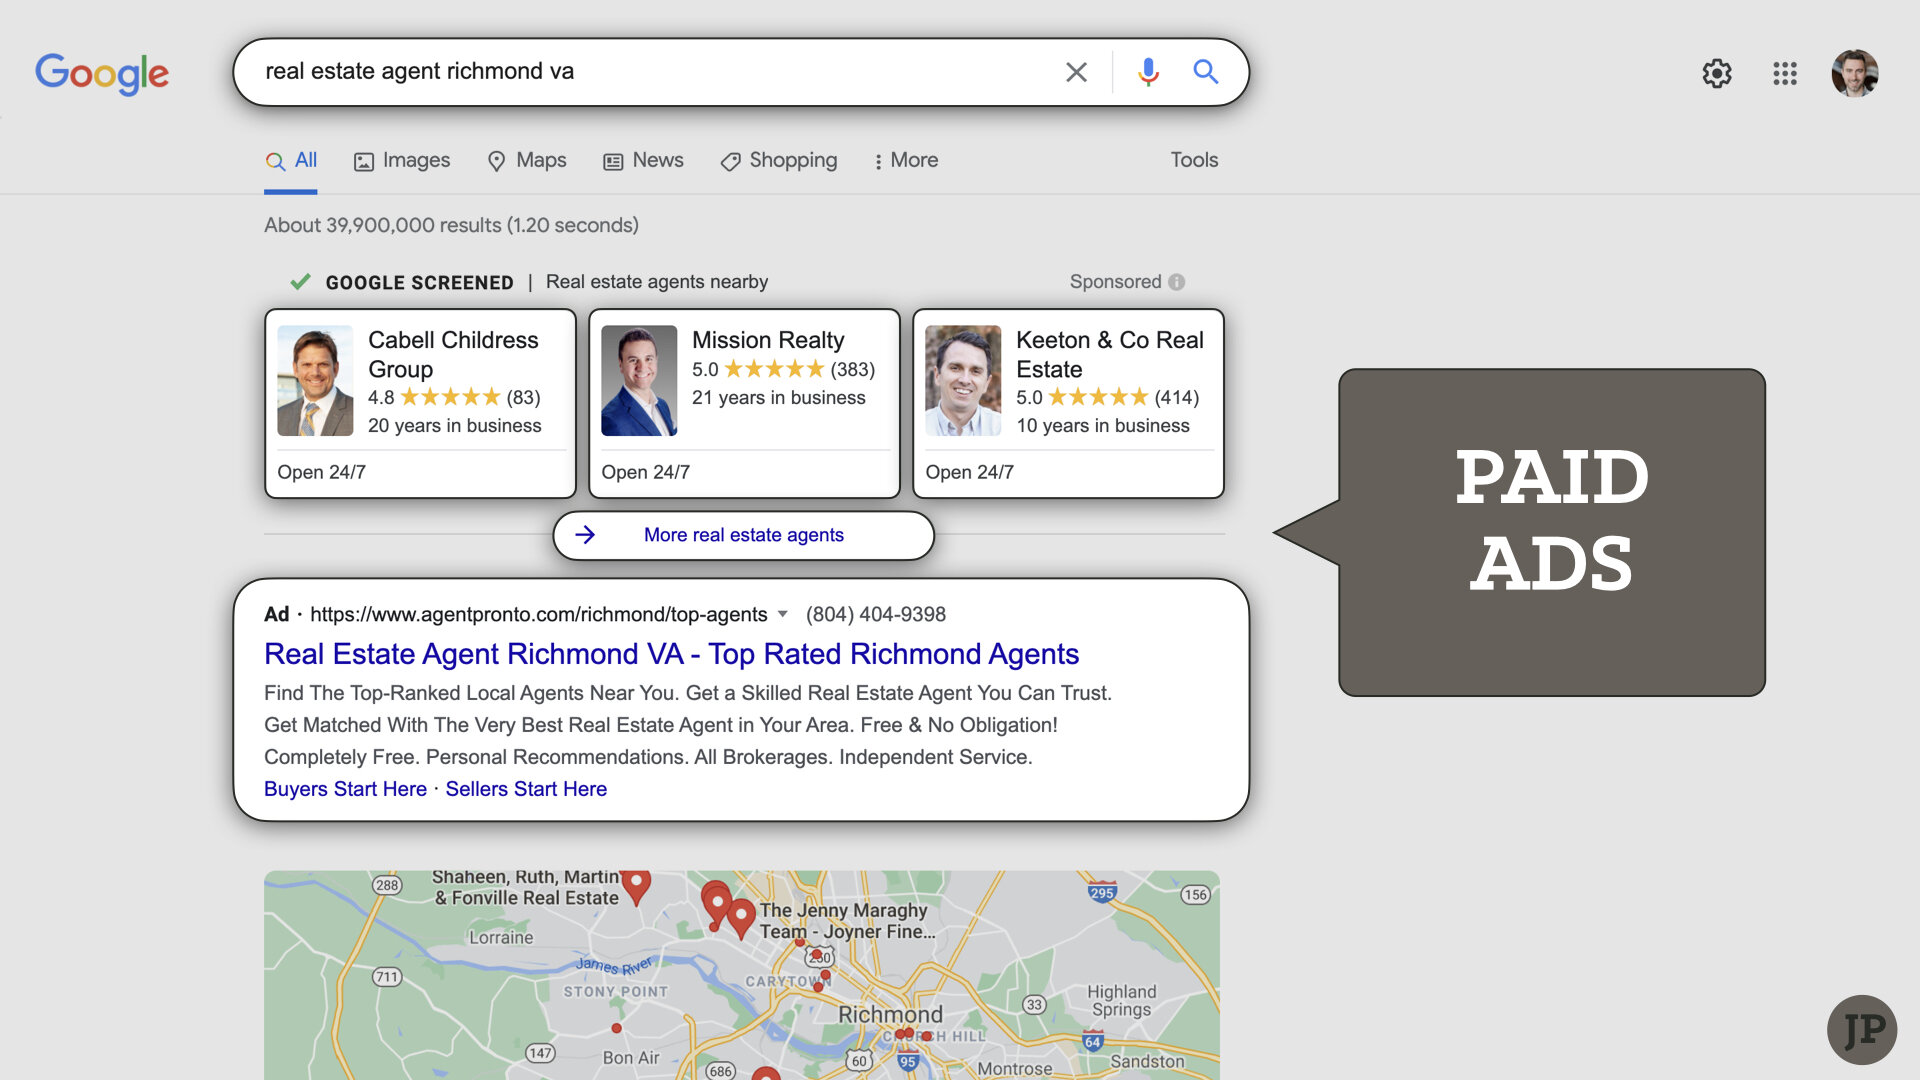
If you perform a local-intent search (i.e., not global or generic search), as mentioned, Google generates local results and it divides them into various sections:  paid ads, local-pack, and organic results. Images to illustrate each element are attached below.

Local Search’s MVP:  Google My Business (GMB)

GMB listings appear inside Google Maps and/or Google Search.

Like I said before, all local-intent searches will trigger a list of geographically tailored results. However, GMB profiles in particular display only when Google infers the searcher is specifically seeking a certain local business—not just generalized local info.

For instance, a search like, “Top kids activities in Nashville on a rainy Saturday,” will populate local results but (probably) not GMB. Point is, GMB is one component of many when it comes to Google’s local search results.

The stronger your GMB profile’s location authority, the more likely it is to display in the search results.

A would-be customer might directly search the name of your business or, and this is the point of today’s video-training/blog, they may search for a business LIKE yours. The question is, will your GMB rank or will it rank your competitor?

Ranking in Google’s “Knowledge Graph”

Once again, GMB profiles may appear in Maps or Search, desktop or mobile. They all function the same algorithmically-speaking (as far as ranking-factors go) but each looks just a tad different from visual standpoint.

In Google Search, for instance, your GMB profile may appear in what’s known as the “Knowledge Graph,” which, when viewed on a desktop browser, displays a section on the righthand portion of the screen that compiles information gathered from multiple sources into one concentrated space. On a mobile device, it’ll appear at the top of the page. Reference the image below.

The Knowledge Graph shows the most info:  photos, phone number, a button to visit your website, hours of operation, customer reviews, and more.

Typically a potential customer would have to search the name of your business to trigger the Knowledge Graph. Question is, how strong is the location authority of just “your name?” For example:

  • Did the searcher type just your name, “Jane Doe,” and that alone had enough location-authority packed in to populate your GMB profile in the Knowledge Graph?

  • Did the search have to add a geographic modifier, like, “Jane Doe, Nashville,” and that’s what sent it over the edge?

  • Did they add a job-category modifier, like, “Jane Doe, Realtor” or “Jane Doe, real estate agent,” and that’s what did the trick?

Ultimately, it’s a (not-so-simple) matter of location authority.

Ranking in Google’s “Local Pack”

The other way your profile might rank in Google Search is in what’s known as the “Local Pack,” a section on the results page that shows a handful of local businesses related to the search query.

You’ll see a rectangular bit of map first with scattered location pins indicating the addresses of the sample businesses, and, below that, a ranked list GMB profiles (usually only a few). At the bottom of that list, there’s a “View All” button, which’ll take you into Google Maps where it’ll show you additional search results.

Google My Business Profile Tips for Real Estate Agents 2021.003.jpeg

These results generally appear, not when a user searches your business name, but when they search out your business category—as in, “real estate agents nearby” (or something to that effect). And so today, we’re especially talking about how to improve your GMB ranking in the Local Pack.

Leveraging GMB Insights

Google My Business compiles detailed and instructive analytics reporting based on how customers discover your business:  Google Search, Google Maps, desktop, mobile, etc. It also tracks the actions customers take, such as phone calls, direction requests, website clicks, and/or messages.

Simply navigate to Business.Google.com to access the backend of your profile and tap the “Insights” button in the main menu. Search traffic is divided into three categories:

  • Direct Searches: a customer searched for your business by its name or physical address. In this case, your profile probably populated in Knowledge Graph.

  • Discovery Searches: a customer searched for a category, product, or service that triggered your GMB to show in search results. Odds are, your listing was ranked in the Local Pack.

  • Branded Searches: a customer searched for a business similar to yours. So, presumably, a customer perused the GMB profile of a competitor via the Knowledge Graph. Then, at the bottom of the Knowledge Graph, they most likely saw your listing in a section called, “People also search for.”

    So think about it… the more your business ranks in Discovery Searches, the more likely it’ll also appear in the “People also searched for” section of your competitors’ profiles! Hence why this post is focused on rating in the Local Pack!

There’s also a button at the top of the Insights screen labeled, “See new profile performance.” (For the time being, only the primary-owner of the GMB account can access it.) Once opened, you’re able to review the exact search queries that triggered your profile to rank. It’ll even tell you how many times each query was searched! That’s downright useful data!—I’ll show you exactly why in an upcoming section below.

Top Local-Pack Ranking Signals

Late last year WhiteSpark organized an extensive report outlining the top factors Google analyzes when ranking Local Pack search results. Today’s video is examines five out of 15. That said, I’ve included the full list below.

  • The Primary GMB Category: It’s pretty straightforward—if you’re a “real estate agency,” say so! Visit business.google.com, tap “Info” in the main menu and define your primary business category.

  • Keywords Located in the GMB Business Title/Name: This one’s rife with controversy. Technically, GMB guidelines prohibit the practice of “keyword stuffing,” which means including unnecessary words in your business title to try to rank on key searches: e.g. “Top Nashville Realtor,” “Nashville Brokerage,” “Nashville Real Estate Agent,” etc. In fact, by doing so, it can result in the suspension of your profile—of which, there are two types:

    • Soft suspension: basically, your GMB’s “verified” status is removed and you can no longer edit/manage your GMB. It still lists and ranks in searches though.

    • Hard suspension: your GMB is altogether removed—meaning, it’s over! 😱 Your profile will no longer index in Google Search or Maps. (Here’s a useful blog on the most common reasons for suspension and how to deal with one.)

      Search Engine Land conducted a sample analysis in which the found that Google took action against roughly 40% of GMB accounts engaged in adding “unnecessary” and/or “unreasonable” terms and descriptors that didn’t match-up with their real-world business names.

      The big problem is, the use of keywords in a GMB’s business title no-doubt improves its SEO! So there’s sort of a double standard at play: GMB doesn’t want you to do it but the search algorithm is programmed to look for it. With that being said, I’m certainly not suggesting you should do it, because, if you do, you knowingly expose yourself to the risk of suspension.

Google My Business Profile Tips for Real Estate Agents 2021.005.jpeg
  • Physical Nearness of Business Address to the Point of Search: In the Local Pack (as well as in Google Maps), assuming your browser is tracking your device’s physical location, it’ll actually show your geographic distance to the address of the subject GMB.

  • Location of Physical Address in the City of Search: This is sort of a pass-fail factor. Is your GMB’s physical address within the city named in the actual search query. For example, “Real estate agent Brentwood, TN.” If your GMB address is in Brentwood, it’ll improve your ranking.

  • Utilizing Additional GMB Categories: You’re able to add additional business categories — and you should! Google periodically adds additional categories from which you can select, so check from time-to-time. Just make sure you don’t choose categories that are unrelated to your work.

  • Quantity (and Authority) of Links to Your Website: Basically, if other popular and credible websites link to your website (i.e., the URL listed as your business’s website in the Info section of your GMB), it’ll make your GMB look better in the search results.

  • Keywords in Google Reviews: This is huge! When customers review you, (discretely) request that they incorporate strategic keywords (e.g. your full name, your team or brokerage name, geographic modifiers, such as the neighborhoods or cities where you conduct business, and/or general phrases about buying or selling real estate).

    Refer back to the part where I talked about “See new profile performance” section in the Insights of your GMB. Use it to determine the keywords on which you’re already ranking AND/OR the phrases on which you’d like to rank on more frequently.

  • High Google Star Ratings (i.e., 4 - 5): Basically, try not to get lousy reviews, LOL 😂 — aim for four stars and up!

  • Removing SPAM Listings via SPAM Fighting Techniques: If you spot fake or illegitimate GMB profiles outranking you in the search results, flag ‘em! Recommend a name-change, mark it as closed, or fill out a Business Redressal Complaint Form.

  • GMB Profile “Completeness”: Yeah, this one’s obvious... as in, OBVIOUSLY EASY! No excuses, fill out every section of your GMB—down to the tiniest details: opening date, appointment links, and so forth.

  • Verified (VS. Unverified/Unclaimed) GMB Listing: If you’re not already verified, do so here: Verify your business on Google.

  • Number of Google Reviews (that Include Text, Not Just a Star-Rating): Essentially, that means get more GMB reviews.

  • Keywords in the GMB Landing Page Title: Add keywords that align with your GMB’s keywords in the title page of your URL domain (e.g. “Nashville real estate agent”)

  • Quality and Authority of Links to GMB Landing Page Link

  • Product- and/or Service-Related Keyword Relevance Across Domain: Does the content across your website match-up with the scope of services offered according to your GMB? If yes, great. If not, fix that!


Keep in mind, ranking in Google’s local search results doesn’t necessarily mean your GMB is fully optimized to to perform in terms of customer conversion. Candidly, it’s just the first step. What ultimately matters is whether or not the customer likes what they find, which boils down your reviews, photos, products, posts, your website, social media links, and more. Click HERE to learn more on how to upgrade the performance of your Google My Business profile.

1 Facebook Ad Campaign to Promote ALL Your Content: Videos, Blogs, Social Posts, and More!

Content creation—let’s face it!—is a major undertaking 😓 The time and effort involved to consistently produce and publish blogs, videos, and social posts takes a toll.

Notwithstanding, if/when a video goes viral, if/when a blog ranks in the search results, and if/when a social post generates a bunch of hearts, likes, comments, and shares—well then it’s all worth it!

On the other hand, if/when the content doesn’t perform as hoped or expected, then it’s easy to get all gloomy and question the point of what you’re doing.

It’s sort of like the old saying:

If a tree 🌳 falls in a forest and no one is around to see it fall, did it make a sound?

The truth is, if nobody was around, then WHO REALLY CARES⁉ 🤷‍♂️

The same principle applies in your content marketing. Videos with hardly any views, posts without hearts, saves, or comments—for all intents and purposes—never actually happened.

We know social networks and search engines alike—algorithmically speaking—simply do not rank or circulate content that doesn’t perform.

And if your content never appears before its intended audience, then, honestly, who really cares!? For all intents and purposes, it’s as if that content never actually happened.

So… 🤔 what to do?

Whatever should you do? Well, one idea, for instance, is to ante up 💰and pay-to-play—Boost your posts on Facebook and Instagram to purchase the desired attention.

Granted, your issue could be—and, to put it bluntly—probably is the content itself. I’m not trying to sound negative or insulting here, but I’d be remiss if I didn’t bring that up. And if your content isn’t performing organically, presumably, it won’t perform as an ad either. A discussion for another time, perhaps.

Additionally, Boosting introduces yet another step in an already laborious content-publishing process. And what’s more, there’s a learning curve to it:  declaring ad objectives with every promotion, specifying your target audience(s), setting budgets, and so forth. It’s not as effortless as you’d think.

And to do it with every post!?—that’s just inefficient. Once again, some of your posts will make for effective ads, others won’t. For those that don’t, it’s purely a waste of money. (Ref. my comments above about poorly performing content.)

Still, something has to be done. After all, if your content isn’t reaching its intended audience -- or, better yet, if it is but not the the extent it deserves, considering its quality -- then a paid strategy makes perfect sense. I mean, my goodness, if the content is performing organically (on a small scale), then all the more reason to double-down via paid promotions to expand the size of your audience by an order of magnitude.

How (and Why) to Promote Your Content

For starters, content promotion helps to:

  1. Maximize the usefulness of each and every post!—videos, images, et al. Squeeze every last drop, so to speak. A post shared to social, for example, has a relatively short lifespan—up to a few days at best. Promoting your content is just economical.

  2. Grow your audience. For instance, if, as a byproduct of your content-publishing efforts, you’re already generating inbound, organic leads, then a bigger audience will theoretically multiply those results. 

  3. Retarget your existing audience(s).  E.g. website traffic via your Facebook Pixel, all your leads and contacts stored in your CRM, and s0 forth. Once again, if your content never appears before its intended audience(s), then it’s as if it never actually happened.

“One campaign to rule them all.”

In the training video above, I explain how to create a SINGLE (Facebook/Instagram) ad campaign to promote ALL your social content -- posts you’ve shared within the past week or even the past month. This method of promoting content, compared to Boosting every post (on Facebook/Instagram), for instance, offers some noteworthy benefits:

  • One-and-done! You don’t have to create a new campaign (i.e., separate Facebook and/or Instagram ads) for every single post. Instead, you create just one campaign with multiple ads—each ad, just to be clear, represents one of your selected posts.

  • Algorithmic autonomy. Remember, if your content doesn’t perform organically, it’ll probably flounder as an ad too. That means, if you’re running ads for each post separately, some, inevitably, will be duds. Using this technique, however, Facebook-and-Instagram’s learning algorithms can decide which of your ads (i.e., your posts) will work best depending on the audience it’s targeting. So, bottom line, it’ll get you a better cost-per-result.

Step-by-Step Instructions

From a technical standpoint, in today’s training, we’ll build one Campaign with two Ad Sets and three Ads. (“… Easy as A-B-C 🎶 1-2-3…”) When I tested it for myself, the results were astounding! Hierarchically, it’ll look like this:

  • Campaign (I)

    • Ad Set (A) | Retargeting

      • Ad | Post (i)

      • Ad | Post (ii)

      • Ad | Post (iii)

    • Ad Set (B) | Targeting

      • Ad | Post (i)

      • A | Post (ii)

      • Ad | Post (iii)

Structure of a Facebook Ad

  • Campaign - specifies the primary objective you’re trying to achieve: e.g. video views, engagement, traffic, etc.—it’s the foundation of the advertisement.

    • Ad Set - defines who you’re targeting (and/or who aren’t) as well as how much you’re spending and for how long.

      • Ad - all the creative/media elements: e.g. images, videos, text, links, etc.—this is where you’ll select the post you would’ve previously published organically and will now use for a paid promotion.


  1. Log into your Facebook Business Manager.

  2. In the main menu, select “Audiences.” We’ll prepare who you’re targeting/retargeting before building and running the campaign itself because it can take Facebook and Instagram up to 24 hours to aggregate custom audience(s)—just getting a head-start.

  3. Tap the blue button labeled, “Create Custom Audience.” Once the window pops up, make your selection(s). In the training video, we’ll construct several custom audiences—e.g. your Facebook Pixel web traffic, uploading a spreadsheet of your CRM data (i.e., leads, contacts, et al.) as a customer list, Facebook Page and Instagram Business Profile engagement audiences, and more.

  4. Next, access the main menu and select “Ads Manager.” Tap the green button that says, “Create.”

  5. Choose your campaign objective. Note that if, for instance, you select, “Video Views,” then you can only use videos in your ads. Depending on the type of content you’re looking to promote, you may opt to choose a more flexible objective or you’ll need to create more than one Campaign.

    Scroll down in the window to name the Campaign and the Ad Set. There’s no reason to name the Ad as of yet. Press to continue.

  6. At the Campaign level, declare any applicable Special Ad Categories, such as Housing for my real estate practitioner friends. Ensure the “Campaign Budget Optimization” setting is toggled OFF. Press to continue to the next section.

  7. In the Ad Set level, scroll down to the “Budget” section and allocate a daily spend. Also, make sure to set an End Date! After that, navigate to the “Audiences” box and add the custom audiences we made back in step #2 inside the “Include” text field.

    Next scroll down to the “Locations” heading and make sure that your defined geographic area doesn’t inadvertently exclude any folks in your custom audiences. If you chose a campaign objective like “Video Views,” in the “Optimization and Delivery” box, tap, “Show more options” and opt to only be charged for ThruPlays. In other words, require Facebook/Instagram put its money where its mouth is!—only pay for results, not impressions. At the bottom of the page, click to continue to the next section.

  8. At the Ad level, scroll down to the “Ad Setup” box, tap the dropdown menu and choose, “Use existing post.” Then, tap the “Select” button to peruse your previously published posts on Facebook and/or Instagram. Choose one and edit placements as necessary (e.g. too much caption text for Instagram).

    Scroll down and check the box to make sure you’re Pixel is tracking “Website Events.”

    Finally, scroll back up to the top and name your Ad whatever you like so that you can easily recognize which Ad it is.

  9. On the lefthand sidebar, look for the “…” to the right of your selected Ad. Tap it and choose to “Duplicate.” It’ll ask you if you want to start a new Campaign or add to an existing one. Obviously, specify the latter. Pick your current Campaign as well as the current Ad Set and then click to continue.

    Once that’s done, scroll down to the “Select” button and pick your next post. Same as before, make sure “Website Events” are being tracked, re-name the Ad, and then duplicate it again and as many times as necessary depending on how many posts you plan to include in your Campaign.

  10. Once you’ve added all your Ads (i.e., your posts), on that lefthand sidebar, click the “…” next to the Ad Set and make a duplicate. Be sure to add it to the current Campaign. It’ll automatically make copies of all your Ads too—streamlined and efficient!

    Rename the Ad Set as you see fit. For instance, I would call the first Ad Set something to the effect of, “RETARGETING…” since it’s aimed at your custom audiences. For this Ad Set, something along the lines of, “TARGETING…” would make sense—because, this go-around, we’re setting our sights toward new growth!

  11. In the (new) Ad Set level, scroll down to the “Audiences” box and remove (i.e., just “X-off”) those custom audiences. Then, tap the “Exclude” button and re-add your custom audiences in its text field. So, in essence, we’re telling Facebook/Instagram, for this Ad Set, DON’T TARGET the custom audiences—that way you’re not paying to show those folks the same content twice.

    Make your way down to the “Locations” heading and set, for instance, a 15-mile radius around the city where you conduct business. In other words, you’re telling FB/IG to show your ad to the residents in your marketplace—as in, prospective home buyers and sellers.

    Find the “Publish” button to submit the ad for review and you’re done!


When you’ve got content, you’ve got options. Content is like arrows for a bow 🏹

In other words, the bow is functionally worthless without arrows to shoot. Likewise, it’s hard to target market your message or campaign at an audience without content: videos, blogs, images, and more. Everyone flat-out needs content!

Having said that—while content marketing definitely works—it’s a significant undertaking. What’s more, a failure to maximize the reach and impact of every post is, frankly, a disservice to your efforts.

Use this strategy to:

A. Remarket to your existing audiences, deepening their affinity (and consideration) for your brand.
B. Use your content to attract new followers, subscribers, and future customers.

I want you to hear all-day, everyday:

Oh, you’re that agent! I see you EVERYWHERE!.

Win the mindshare of the marketplace to become the agent-of-choice.

How to Optimize Your YouTube Channel and Videos for Search to Get More Views

#YouTube is not a social network; it’s a search engine (mostly).

When you think about it, social networks are kind of like listening to the radio. For instance, if you don’t like what the DJ’s playing, just scan to the next station (if that’s still a thing). In the same way, if you don’t like a certain post on social, just keep scrolling down the feed.

But YouTube is different. It’s both: a search engine AND a social network.

(**Technically speaking, the parts that make YouTube somewhat like a social network versus a just standalone search engine include its Home and Subscription feeds plus its Suggested Videos boxes on sidebars and end-screens.**)

What’s more, it the second-most popular website on the planet, runner-up to its parent company, Google—beating out the likes of Amazon, Facebook, Zoom, and more.

So, consequently, it’s important to properly configure your channel and video-uploads to be seen by the largest possible viewer audience. Here’s what to know and do:

How to Setup Your YouTube Channel:

  1. Utilize the YouTube Studio (studio.youtube.com) to optimize your channel. Start in the main Settings tab, in which you should specify Channel Keywords and link to your Google Ads account.

  2. While still in the YouTube Studio, click the Customization tab to format your channel. In the Branding section:

    • A. Attach your Channel Icon image (i.e., your profile pic). Ideally, it’s your headshot.

    • B. Upload Channel Art (i.e., the Banner Image spanning across the top of your page). YouTube recommends using an image that’s at least 2048 x 1152 pixels and 6MB or less. Here’s a link to more info about Channel Customization.

    • C. Insert your business logo as a branded Watermark (i.e., YouTube will overlay your logo in the lower-right of all your videos, no matter where they’re viewed).

      In the event another channel adds your video(s) to a playlist of their own, if users discover your content via YouTube’s browse features, and/or if your video is watched outside of YouTube, perhaps embedded into a blog, the branded watermark acts as a name tag of sorts, symbolizing that the content belongs to your channel.

      Some YouTubers attach a custom-designed “subscribe” button instead of their business logo. That’s fine, only, when it’s clicked, it doesn’t deep-link to your channel’s subscribe URL, just to its homepage. Granted, from there, it’s only one more click to actually Subscribe—so, to each their own, I suppose.

  3. Navigate to Basic Info (still in the Customization tab) and compose a Channel Description (probably just using your bio), add Links, which will turn into little icons on the lower-right of your Channel Art, and, once you’ve surpassed 100 subscribers, create a custom URL for yourself.

  4. In the Layout section of the Customization tab, specify a Featured video for returning subscribers and/or link-up a Channel Trailer (i.e., a video that gives non-subscribers a glance at what your channel is all about).

  5. Still in the Layout section of the Customization tab, scroll down to the Featured Sections portion of the page and customize to your liking. The Sections are the “shelves” of videos on the homepage of your channel, arrayed from left-to-right (on desktop). For instance, you can feature a single playlist, add multiple playlists to a single row, specify where to position a livestream in the event you start a broadcast, feature other channels, or even showcase a playlist of other channels’ videos (e.g. the “guest appearances” playlist on my channel).

    If you don’t add sections to the homepage of your channel, your page will, by default, only have a single section (i.e., just one row) containing all your uploads. In other words, it’ll make your channel look like it’s void of content even when you may have a ton of it!

  6. In the Studio, tap Playlists in the menu and navigate to the “New Playlist” link in the top right. Create playlists to organize your videos.

    If you’re producing, for instance, a weekly show of sorts—whereby all the videos belong together—you can mark the playlist as an “official series.” Note: a video can only be included in one series—though it can be in as many “regular playlists” as you’d like.

    The major benefit of playlists is that they help encourage viewers to consume your videos in succession versus just one-and-done.your videos in succession versus just one-and-done. From an algorithmic standpoint, this is huge! Group your videos into topic-specific playlists to encourage binge-watching.


The YouTube Algorithm:

The YouTube algorithm considers two primary variables: A. Click-Through Rate (CTR) and B. Watch Time (aka, “Audience Retention”).

CLICK-THROUGH RATE:
The Click-Through Rate means, that when a prospective viewer is shown your video—in search results, as a recommended next video, or in YouTube’s browse features, for instance—YouTube monitors how often viewers click to watch. If they do click to watch, that signals YouTube to keep distributing your video far and wide. If they don’t click, then YouTube stops, pure and simple.

Your video’s thumbnail (i.e., the preview image attached to the upload) and its title are the top factors influencing the CTR of your videos.

WATCH TIME:
Watch Time is what it sounds like: the total amount of time viewers spend watching a given video—or better yet, a channel’s videos combined together. You can think about Watch Time through a couple of different lenses:

  • Qualitatively. Create and share videos that hold viewers attention AND fulfill on the implied promise(s) of the video’s thumbnail and title Otherwise, if your video suggests one topic but covers another, that’s a bait-and-switch. As a result, the viewer is likely to bounce pretty quick. And it’s just simple logic—from YouTube’s POV, the longer a person watches a video, the more opportunities there are to show ads.

  • Quantitatively. The more videos a channel has to show its viewers and subscribers, the greater YouTube’s willingness to display said channel’s videos in its browse features and/or in search results.

    Consider this: you could make the world’s greatest video, however, if it’s the only upload on your channel, there’s no video for that user to “watch next”—at least not on your channel. I call that, a “cul-de-sac channel”—it’s a dead-end for YouTube. There’s a network effect component at work—a greater number of videos increases Watch Time, which motivates the algorithm to start working on your behalf.


7. Optimize each and every video you upload. Watch my video above for detailed instructions and best-practices for crafting a search-ready title, specifying your video tags, and composing the description. Consider using a tool like TubeBuddy to aid you in your optimization efforts.

8. Leverage YouTube features to the hilt! Try incorporating hashtags, video chapters, adding CTA links in the description, end-screens, cards, and more. Do every little thing you can to get one big result: MORE VIEWS!

Whether by a mechanism of search or social, it’s mission-critical to setup your YouTube channel and your video-uploads properly to maximize your viewership and dominate on YouTube. The goal is for your videos flourish over time, attract business, and enable you to win in the game of content. Stop waiting; start creating!

Generate Seller Leads with this Proven Facebook Ad Strategy: Name Your Price (Part 2)

The question remains: At what price would you be CRAZY not to sell?

Today’s training is PART II of Tom Ferry coaching member, Matt Curtis’, NAME YOUR PRICE campaign - and this time around, we’re talking about Facebook Lead Ads.

Home values continue to soar in real estate markets across US and abroad. In fact, in many cases, homeowners are literally earning more in equity month-by-month than the cost of their mortgage payment. In a way, it’s as if they’re being paid to own the house!

But the thing is, home-equity is like casino-chips; it’s all worthless until you cash-out.

Hence the question: at what price would you be CRAZY not to sell?!

MAKING THE AD CREATIVE:

Before jumping over to the Facebook Ads Manager to setup and run the campaign, you’ll need to design a simple graphic (like Matt’s) to use as the ad’s primary media asset. Consider using a tool like Canva or an alternative.

The way Matt’s image is configured is ideal. Like Matt’s, yours should include a pic of you with a text bubble superimposed that states the primary call-to-action (CTA): “NAME YOUR PRICE.”

Below the text bubble, Matt’s graphic lists out sample sale prices and then marks through them, indicating just how rapidly median home values have jumped up in his marketplace. Finally, a circle is drawn around the highest number, signifying current market conditions.

So the image-text reads like this:

  • CTA Text-Bubble: “NAME YOUR PRICE”

  • Price-Building Bullets: Not $###,###, Not $###,###, But $###,###

Name-Your-Price-Matt-Curtis-Real-Estate-Jason-Pantana.jpeg

CREATING THE FACEBOOK AD:

  1. Launch your Facebook Ads Manager open. Simply navigate to facbook.com/adsmanager OR navigate to the “Ads Manager” from within your Facebook Business Manager (or Business Suite).

  2. Ensure you’re in the “Campaigns” tab and then tap the green “Create” button to start.

  3. Select the “Lead Generation” option and press “Continue.”

    NOTE: Due to recent privacy changes—e.g. iOS 14.5’s App Tracking Transparency Framework (ATTF)—Facebook’s Pixel has been severely impaired. Watch/listen to the Marketing Stream episode I recorded with Ylopo CMO, Juefeng Ge. Because of that, using a Lead Form (aka, “Instant Form”) versus directing traffic to an external website has a serious advantage. As long as users remain in the platform, Facebook has optics. However, if an opted-out iOS user clicks at CTA button in your ad and leaves Facebook, even if your site is properly Pixeled, Facebook will be in total darkness.

  4. Once the campaign-builder launches, specify “Housing” in the “Special Ads Category,” scroll to the bottom of the page, and press “Next.” After the screen loads, make sure you’ve agreed to “Facebook’s Lead Ad Terms.”

  5. Scroll down to the “Audiences” box and input the geographic area you’d like your ad to target. Directly above the map widget, there’s a drop-down list. Tap it and choose “People Living in this Location.” That way, you’re truly targeting locals.

  6. Scroll back up and take a peek at the “Budget” box. Tinker with it until you’re satisfied with the daily estimates displayed along the right-hand sidebar. I’d recommend a daily budget for “Lead Generation” campaigns.

    **If your campaign is estimating zero leads a day no matter the adjustments you make, it doesn’t necessarily mean that’ll be the outcome. It just means, based on the historical performance of your past ads plus myriad other variables, Facebook is struggling to forecast the results. Just move on.**

  7. Scroll to the bottom of the page and press “Next” to enter into the “Ad Creative” stage of building-out the campaign. At the top of the newly loaded page, ensure your Facebook and Instagram accounts are linked-up. Find your way to the “Ad Creative” box. If Facebook auto-inserted an image (like your Page’s Cover Photo, for instance), just tab the blue text that reads, “Clear All.” Then, under the “Media” heading, tap the drop-down menu and choose, “Add Image.” Pull in the graphic you made earlier on.

  8. In the “Primary Text” and “Heading” fields, add your copy and headline. Try using the “add another option” feature to give Facebook a few variations to trial.

  9. Change the “Call-to-Action” button from “Sign-Up” to “Learn More.”

  10. Scroll down to the “Instant Form” box and tap the button, “Create Form.” Refer the video for step-by-step instructions.

  11. Publish your campaign!

NOTE: Be sure to ALSO watch #PantanaProTips episode, Agent's Guide to Generate SELLER LEADS (Using Facebook Lead-Form Ads), published back in April, 2021. It contains a super detailed tutorial for building Facebook Lead-Form Ads.

NAME YOUR PRICE, done-and-dusted. Friends, no doubt, we’re facing a substantial inventory crisis in housing markets here, there, and everywhere. However, I’d argue that there are just as many in-market sellers as ever; they’re just not in-the-market, if you catch my meaning. It’s up to you (and your marketing) to reach those individuals and outline an action plan to help them move forward (so you can list-up those properties).

PLEASE leave a comment to let me know what you think of this training. Also, make sure you turn on notifications when I publish new content so you don’t miss out on future episodes.

Happy listing & selling!

Generate Real Estate Seller Leads with This Proven Marketing Strategy: Name Your Price! (Part 1)

“Yes, really… NAME YOUR PRICE.” That’s the email-offer Tom Ferry coaching member, Matt Curtis, is sending out to his database - and it’s creating new listing opportunities in abundance!

(As we all know) listing inventory is alarmingly low 📉, so don’t expect houses to just fall into your lap. Today’s MARKET belongs to agents who MARKET to create inventory when and where there is none.

If you’re looking for a seller-focused lead generation strategy, you’re in the right spot! Today’s video will outline a word-for-word email campaign designed to source listings straight out of your database.

Keep in mind, the National Association for REALTORS reported that approximately 67% of sellers identified a real estate agent to list and sell their property by way of repeat business or a referral from a friend, family-member, or neighbor. In other words, roughly 2/3 of your listing opportunities are likely stashed away in your DATABASE, ready and waiting on you! So let’s get to work.

Heads up... I’m planning to release a series of videos devoted to the NAME YOUR PRICE campaign. Today’s video is focused on the database email. I’ll layout a Facebook ad strategy in the NEXT VIDEO.

The “Name Your Price” Email:

Email composition is an art form. It’s words! To that point, according Oxford English Dictionary, there are more than 170K (English) words currently in use. Point is, you must choose your words strategically!

Parts of the Email:

  1. Subject Line: casual, clear, and engaging; all lower-case.

  2. Personalization: utilize merge tags to incorporate recipients’ first names—e.g. Hi {FIRST NAME}.

  3. Opening Line: fulfills on the subject line; creates curiosity and sets up a basis for the offer.

  4. Calibrated Question: yes-or-no question poignantly asked directly before making the offer.

**There are two types of questions: open-ended and closed-ended. Open-ended questions ask “Who,” “What,” “How,” “When,” “Where,” or “Why.” They’re designed to draw out more meaningful responses versus closed-ended questions, which typically result in a “yes” or “no” type of answer.

A calibrated question is, technically, a close-ended question, only, it’s intended for closing; it’s to be asked at the moment when a definitive (or rhetorical) response is exactly what’s needed.

For example, “At what price would you be CRAZY not to sell?”**

  1. 𝗖𝗮𝗹𝗹-𝘁𝗼-𝗔𝗰𝘁𝗶𝗼𝗻 (𝗖𝗧𝗔): a “Name Your Price” button linked to a Google Form.

  2. 𝗣𝗿𝗲-𝗙𝗿𝗮𝗺𝗶𝗻𝗴: first CTA has been skipped; addresses the primary objection or challenge preventing offer acceptance/action.

  3. 𝗔𝗹𝘁𝗲𝗿𝗻𝗮𝘁𝗶𝘃𝗲 𝗢𝗳𝗳𝗲𝗿: hyperlinked text embedded in the pre-frame (i.e. no buttons); links to same destination as the CTA.

  4. 𝗣𝗿𝗼𝗽𝗼𝘀𝗶𝘁𝗶𝗼𝗻𝗮𝗹 𝗖𝗹𝗼𝘀𝗶𝗻𝗴: builds on pre-frame to position offer as a solution to the problem/challenge.

  5. 𝗖𝗮𝗹𝗹-𝘁𝗼-𝗔𝗰𝘁𝗶𝗼𝗻 (𝗖𝗧𝗔): a “Name Your Price” button linked to a Google Form.

TRIPLE-STRIKE CTA

Notice how Matt’s email embeds his offer again-and-again throughout the email copy.

The first CTA button, “Name Your Price,” is inserted toward the beginning of the email. Then, in the event his case wasn’t strong enough to get certain viewers to click, he pre-framed the most common/likely objection, followed by a soft offer to “let us know”—which was hyperlinked to the same destination URL as the first CTA.

Finally, he re-used the primary CTA button at the end of the email to make one last pass.


Here’s a shortlist of some Email Service Providers (ESPs) to analyze:

  • BombBomb

  • MailChimp

  • SendGrid

  • AWeber

  • Convert Kit

  • SendFox

  • Sendinblue

  • Omnisend

  • Keap

  • MailJet

  • Constant Contact

  • Drip

PLEASE leave a comment to let me know what you think of this training. Also, don’t miss Part 2 where we breakdown the Facebook ad strategy!

RETARGETING (Real Estate) Leads with Facebook Ads: How to Re-engage Leads Who HAVEN'T Liked Your Facebook Page

Leads are easy; conversion is hard. In real estate, for instance, the distance between generating a lead (a buyer, seller, or both) and ultimately converting that lead into a qualified client is a pretty wide gap.

In fact, all said and done, it’s about a two-year process from the time a person first begins to think about the idea of buying or selling a home to when they ultimately carry out the task.

So based on that, the notion of generating leads, following-up like a crazy person for a solid week or two, and then abruptly abandoning the effort seems, to me, short-sighted. But unfortunately, that’s precisely what far too many agents end up doing. For example, have you ever heard of “10 days of pain” types of follow-up campaigns? They follow up excessively and then they just give up. The leads get archived in the CRM or maybe parked inside some type of generic drip sequence — out-of-sight, out-of-mind. We can do better.

What makes a lead, a lead?

Consider that most leads are generated in response to a real estate offer: e.g. “search for a home,” “what’s your home worth,” and so forth. In other words, the offer that’s used to capture a name, number, and email address typically centers around the purchase or sale of a home (not the selection of an agent).

What that means is, for however long it takes to convert a lead, your nurture plan should be all about winning/earning their (future) business.

And to do that, you’ve gotta stay in touch. But not in an annoying, pestering sort of way; in a value-add sort of way -- a lead-nurturing way. And to do that, YOU NEED CONTENT: blogs, videos, and more.

Question is: how do you get your content in front of the leads? The easy options include text-messaging and/or email. With texting, though, be careful not to overdo it—a little goes a long way. Email is a fantastic option, only, it isn’t enough on its own.

Effective Lead Nurturing is Multichannel

Effective lead nurturing goes multichannel. (**If you’d like to read more about multichannel marketing, click HERE.**) In other words, I want your content to show up via email AND elsewhere—ideally across social: Facebook, Instagram, etc.

But if I earned a penny for every time a lead ignored an agent’s (premature) Facebook friend request, I’d be rich. Candidly, to them, you’re kind of a stranger—and so the odds of connecting on social are kind of remote. What’s more, if they don’t accept your friend request, you’re unable to invite them to Like your page (at least not in the app). Sure, you can email them about it, but good luck with that.

My point here is that I want them to Like your Facebook Business Page so that they’re eligible to see your content in the Newsfeed organically. It’s that simple. Otherwise, you can go on producing amazing content—but if your leads aren’t seeing it—then, for all intents and purposes, it doesn’t exist!

RETARGETING Your Leads with Facebook Ads

So today I’m training on how to retarget your leads who HAVEN’T yet Liked your Facebook Page.

Sidebar: Bear in mind that the same process can also be used to directly retarget your leads with specific pieces of content you’d like them to see: videos, image posts, links, and more. In fact, the truth is, even if every last one of your leads ended up Liking your Page, you’d still be wise (on occasion) to directly retarget them with key pieces of content simply because the organic performance of Business Page posts is, frankly, less than impressive.

Here’s how to get started:

  1. Exporting your leads. First off, you need to organize your leads into a spreadsheet. Chances your CRM of choice has an easy option to export your leads into a .CSV file, which is the file-type Facebook requires us to use.

    Your spreadsheet should include as much of your leads’ contact info as possible: name, number, email address, etc. In an upcoming step, you’ll upload that file into Facebook for it to match up your contacts against its own database of accounts. So basically we’ll be targeting (or retargeting, technically) the leads on your spreadsheet, so long as Facebook is able to conclude a match.

  2. Facebook Business Manager. This training assumes you are running ads via the Facebook Business Manager (or a Facebook Business Suite). Access yours at Business.Facebook.com. The feature we’ll be utilizing isn’t always available to what Facebook refers to as Personal Ads Accounts, which is the ad account you were automatically assigned when you created your Facebook Business Page, found at Facebook.com/AdsManager. So if you’ve not setup a Business Manager (or migrated your Personal Ad Account over to a Business Manager), you’ll need to. Here are some helpful links to get you started with that.

  3. Building a “Customer List” Custom Audience. Once in the Business Manager, click the menu button and navigate to the Audiences tool. Once there, tap the first blue button to “Create a Custom Audience.”

    Custom Audiences are Facebook-speak for retargeting. They’re divided into two groupings: A. Your Sources, and B. Facebook’s Sources. Choose the “Customer List” option. Reference the video training above to navigate through the setup wizard, at the end of which, you’ll be able to import your .CSV file.

  4. Creating a Facebook Ad to Get Page-Likes. Once you’ve created your Customer List Custom Audience, click that menu button again and select the Ads Manager. Follow each of the steps outlined and demonstrated in the video tutorial. And make sure you don’t forget the following important details (which are, of course, also mentioned in the video):

    • At the Campaign level, be sure to check the box for the “Housing” Special Ad Category. Also, don’t forget to click the button for Page Likes, not Post Engagement. That’s key!

    • At the Ad Set level, as you’re selecting your Custom Audience, don’t forget to EXCLUDE existing Page Likes. This campaign is designed to retarget only leads who HAVEN’T Liked your Business Page.

    • If the size of your audience seems restricted consider incorporating a second Custom Audience, such as recent website traffic via your Facebook Pixel.

    • Make sure to adjust your location filtering so as not to inadvertently exclude leads in your Customer List. For example, if you generated a lead who lives in Milwaukee and is thinking about relocating to Atlanta (where, let’s pretend, you sell real estate), then make sure that wherever your leads may be physically located, your location settings aren’t overlooking them.

    • Always keep an eye out for those “Show additional options” links. They tend to hide good stuff, such as modifying the billing from impressions to Page Likes. Put your money where your mouth is, Facebook!

Like I said: Leads are easy; conversion is hard. It’s a long game. It’s like how you’re born, you die, and in between, you “live your dash.” Not to be morbid, but with leads, the “in-between” is your lead nurturing -- it’s how you position yourself as the agent-of-choice from the moment you get a lead until they ultimately choose to buy or sell.

To do that, you’ve got to add massive value: blogs, videos, content that helps guide them through the process. And to do that, you need access to their attention (like Facebook). Use the training, start adding value, and step-up your conversion!

Pay-Per-Click "YOUR NAME!" (Dynamic) Google Search Ads (Easy Tutorial) for Real Estate Agents

The first thing a new lead, referral, or even a personal contact is gonna do if they’re thinking about hiring you (as a listing agent, buyer agent, or both!) is GOOGLE YOU! Then the question becomes:  will they or won’t they?

Well, that all depends on what they find, right?—which is why it’s mission-critical to control the first impression!

In today’s training, we’re talking about how to run a (**dynamic**) Google Search ad campaign to rank the link of your choosing at the top of the results page whenever someone searches:  “YOUR NAME.” 

THE VIDEO COVERS:

  1. Setting up a Google ad account

  2. Enabling Expert Mode (vs. Express Mode)

  3. Choosing a campaign goal and type

  4. Setting a bid strategy (e.g. conversions, website clicks, et al.), budget, and schedule

  5. Deploying Dynamic Search Ads!!!
    (**Google scans your website and identifies keywords relevant to it instead of your manually selecting your own keywords. What’s more, DSAs automatically customize your ad’s headline and URL to fit the each and every search phrase that triggers an ad 🤯**)

  6. Crafting Sitelink Extensions, Call Extensions ☎️ and ad copy/descriptions

  7. Publishing the ad campaign!

Frankly, your agent-brand is whatever Google says it is—but Google’s just the messenger, not the message!

Agent's Guide to Generate SELLER LEADS (Using Facebook Lead-Form Ads)

Arguably the most bewildering and immobilizing (real estate) question 🤨 currently facing would-be sellers centers around how to buy a home when you’d have to sell yours first (or at the same time).

Listing and selling isn’t the problem, per se -- purchasing is! Selling, for all intents and purposes, is about as good as it gets:

✅ Generate multiple offers
✅ Under contract lickety-split
✅ Garner top dollar💰
✅ Negotiation high-ground
Lots of homeowners, I’d wager, would downright love to sell in this market! Trouble is, what if that home sells before procuring the next place?! Suffice it to say:  ʜᴏᴜꜱᴛᴏɴ, ᴡᴇ ʜᴀᴠᴇ ᴀ ᴘʀᴏʙʟᴇᴍ! 👩‍🚀
What’s more, we know roughly two-thirds of buyers are sellers. So based on that, it’s reasonable to infer that the motivation to sell is, for many, prompted by a desire to purchase. But if there’s nothing on the market to purchase then there’s no reason to sell, right!? And so it goes—a vicious circle ⭕️
In fact, I’m convinced all of this is a significant factor contributing to present inventory 🏠 shortages.

A couple of months back I did a post in which I recommended agents publish 𝟏𝟎 𝐃𝐚𝐲𝐬 𝐨𝐟 𝐈𝐧𝐬𝐭𝐚𝐠𝐫𝐚𝐦 𝐑𝐞𝐞𝐥𝐬 sharing a different solution/option for buying and selling at the same time w/ each consecutive Reel. Many took the advice, and, as a result, sparked meaningful conversations, booked listing appointments, and so forth. That message really resonated with homeowners—and it still does!


So in today’s video I’m demonstrating (step-by-step) how to convert your 10 ideas to into a downloadable PDF:  𝟭𝟬 𝗪𝗮𝘆𝘀 𝘁𝗼 𝗕𝘂𝘆 (𝗪𝗵𝗲𝗻 𝗬𝗼𝘂 𝗡𝗲𝗲𝗱 𝘁𝗼 𝗦𝗲𝗹𝗹). From there, I’ll share how to setup a 𝑭𝒂𝒄𝒆𝒃𝒐𝒐𝒌 𝑳𝒆𝒂𝒅-𝑨𝒅 in which the PDF is offered for download to homeowners in your local marketplace (i.e., would-be-sellers). This is a full-fledged tutorial with steps, examples, and more. Be sure to watch ‘till the end :D

[VIDEO] YouTube In-Stream Ads for Real Estate Agents: Step-by-Step Guide to Attract Listings in Your Market

Let’s talk to you about how to attract listings in your marketplace using YouTube In-Stream Ads!

I’ll put it like this:  YouTube In-Stream Ads are what Facebook Boosted Posts were when initially released. My point is you’re gonna want to take advantage of ‘em!

YouTube In-Stream Ads are essentially commercials that play before, during, or after a selected video on YouTube.

Additionally, there are a few different ad subtypes:

  • Skippable: the viewer has an option to skip the ad after five seconds. This format utilizes a CPV (cost-per-view) bid strategy so the advertiser only pays when a viewer watches 30 seconds of the video (or the full duration if it's shorter than 30 seconds) or interacts with the video (e.g. clicks a link).

  • Non-Skippable: the ad may not exceed 15 seconds and doesn’t provide the viewer an option to skip. This type utilizes a CPM (cost-per-thousand impressions) bid strategy and so the advertiser pays whenever the ad is shown regardless of how long its viewed.

  • Bumper: same as the Non-Skippable variation except that the ad is limited to a max of 6 seconds.

From a strategy standpoint this training centers around LISTING ATTRACTION 🏡. A couple of months back I did a livestream with Tom Ferry business coach, David Caldwell, during which we discussed how he’s been publishing simple Market Update Videos once-a-month and targeting homeowners in his local marketplace using skippable in-stream ads.
.
.

The 10-minute video above presents a STEP-BY-STEP TUTORIAL on how to run these campaigns—screen sharing, examples, and all.

Please note, the training assumes you’ve already setup a Google advertising account. What’s more, I’m working in Google Ads “expert” mode, not “express” (a.k.a. “smart”) mode. Here’s how to swap, just in case.

.
.
Back on topic:  David runs each ad for 30 consecutive days at $5 a day and, on average, he’s paying between $0.02 and $0.04 a view. And it isn’t just David—it’s been the same for many of his personal coaching clients as well as several of mine. Now here’s the punchline:  whenever David’s cumulative views tally-up to 20,000—like clockwork—his phone rings with a “Come-List-Me!” 🏡 call. If you do the math that’s basically $400 to $800 per listing.

Sounds good to me! We (desperately) need the listings, friends! Perhaps you caught the WSJ’s recent report that there are currently fewer homes for sale in the US than there are licensed real estate agents 😳. Granted, it’s typically not too far off of that figure in normal markets—that’s just a headline. Notwithstanding, inventory is significantly lower this year, no ifs, ands, or buts about it.

Also, consider that most homeowners rely on regional or national news outlets to learn about what’s happening in their local real estate markets. Nope—not gonna cut it! Personally, I believe it’s incumbent on agents to act as “knowledge brokers” at a hyperlocal level.

Why else would you suppose David’s phone rings every 20,000 views? Certainly, I could wager it’s just a matter branding and positioning—homeowners keep seeing David’s face, he seems competent, and, because he’s top-of-mind at the right time, they dial his number.

Far more than that, however, I think it boils down to the value of the information he’s providing. Frankly, how could it be anything else when viewers elect to watch 80% of a video advertisement they could’ve skipped ⏭ after the first five seconds? It’s because the information matters to them! Otherwise, how’s a prospective seller supposed to make an informed choice about whether or not to list, when to time it, or how to navigate through local conditions and competition? My advice:  supply the info; be the knowledge broker.
.
.
.
Please leave a comment, and/or tag a friend or peer who might also benefit from this training. Additionally, if there are other topics you’d like for me to build a training to support, please let me know 😃